Printing Photos on Your Inkjet Printer
Despite the advances in digital photo technology, many people still don't know how to use their printers to print photos. While it's indeed relatively inexpensive to get photos printed at your local Walgreens or Costco, it's a nice time saver to get the job down on your own printer, especially when you only need a few prints done at a time.
Calibrating Monitor
The prints I've gotten from my Epson machines have matched the quality of prints from discount stores and online print sites. I've printed from consumer Epson printers like the the Epson Artisan 700, I recently purchased. Though there's much you can do to prepare your computer and monitor for creating good prints, I have yet to, for example, color calibrate my monitor using any third-party calibrator. I've only used the calibration feature that comes installed with Leopard (see System Preferences>Display>Color>Calibrate). I use an HP monitor and have color calibrated it a few times, but I would imagine that you'd get even better results with an Apple monitor. If you think the color of your photos don't look right on your monitor, or if the colors print differently from what you see on your monitor, you should look into calibrating your monitor. The default calibration in System Preferences I note above includes step-by-step instructions for the calibrating process.

Printing Photos
You don't have to use Photoshop or even iPhoto to print photos. You can print them right from within Leopard's Preview application. The instructions for setting up and printing photos in Preview are similar to what you find in iPhoto or Aperture.
1. Photo Paper: For best printing results, use photo paper produced by the same company that manufactures your printer. I use Epson printers, so therefore I use Epson photo paper. Also consider what your photo printing needs are. For regular glossy prints, start with 4 x 6 ultra premium glossy paper. Photo paper or ink is not cheap, so your first few printing tests should not be done on say 8x11 size paper. If you're printing a brochure or newsletter that includes images, you might choose Photo Quality Ink Jet paper, and for signs or posters, check out the little heavier Premium Presentation Matte paper.
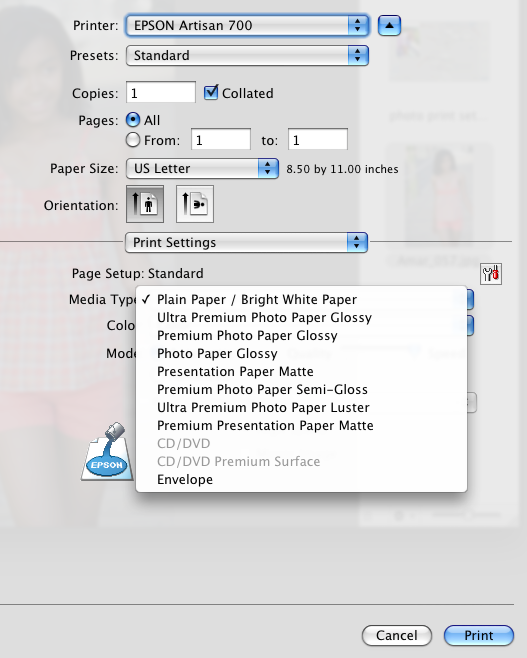
2. Photo Paper Stock: When you're printing photos, it's very important that you select the proper settings for the type of paper you're using. For example, if you use Premium Photo Paper Semi-Gloss, make sure you're not of course using Plain Paper/Bright White Paper setting. Your prints will come out horribly. Even using Photo Paper Glossy setting for Ultra Premium Photo Paper Glossy can produce poor results. You can preview the type of paper your print driver supports by selecting Print Settings>Media Type.

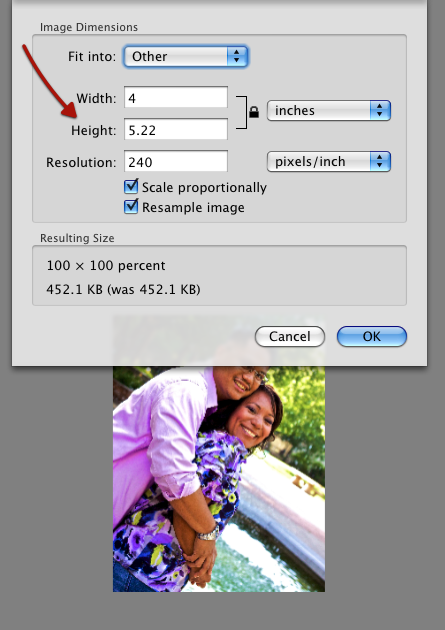
3. Resize Photo: Often times when you first try to print photos, the dimensions of the image don't fill up the paper, even if you're printing with a border. So the best way to make sure the image will fit is to resize the photo for the dimensions of the paper you're using. Before resizing a photo it's probably a good idea to make a copy of it first, just in case you want to keep the original size. You might also consider cropping out waisted background space in the photo so that you can see more of the main subject in the photo. If you have you 3+ magapixel size photo, you can typically do some cropping and not loose much megapixel quality in the photo.

Unless you're shooting photos with a full-frame 35mm, you may have to crop your photo in order for it to fit the dimensions of your photo paper stock. When you send your photos to a local photo printer service, say at Costco, the photos are automatically cropped to fit the paper size, though sometimes it's not noticeable. Often times when I'm shooting with say my Canon 50D, which is not full-frame, I try to leave a little headroom in the shot to compensate for the crop factor when photos are printed. So resize your photo to fit the size of the paper you want to print on.
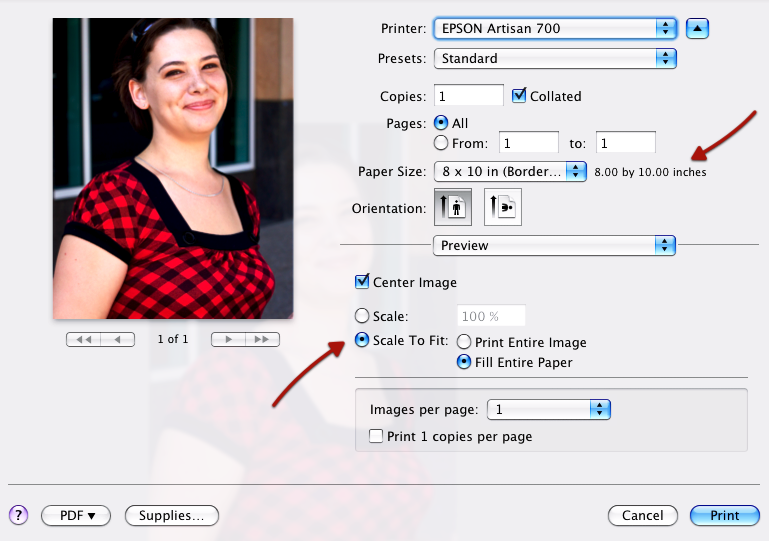
4. Scale to Fit: Many current printers will now print borderless photos. This is great if you plan to frame the photo. But my experience is that you will need to work with the Scale to Fit and Scale settings of your printer application in order to get the borderless print. Your paper size settings may also have an option for borderless prints. With the Leopard's current printing application, you get a perfect preview of how your photo will look before you print it.

5. Save Preset: Once you figure out the settings for specified prints (e.g. 8x10, borderless print, Ultra Glossy Photo Paper), be sure to save those settings as a preset (which I talked about in part one of this article.)
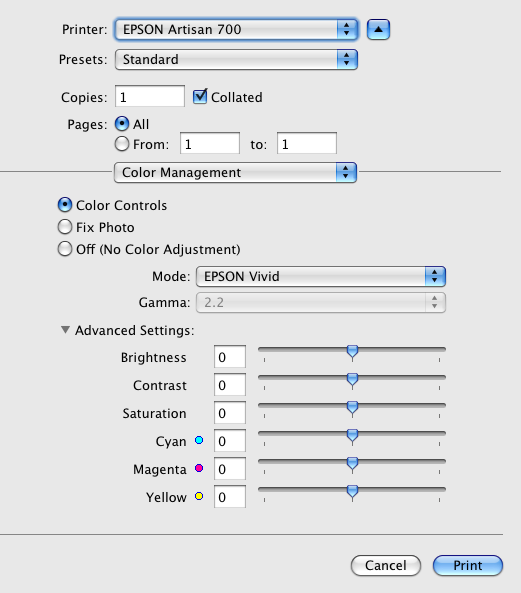
6. Advance Printer Settings: If the colors in your printed photos are not printing well, you will want to recheck your print settings to make sure they match your paper stock. You might also check and use the printer utility settings for nozzle and print head cleaning. And finally, you might check out the Color Management settings in the printer application. These advance settings are for adjusting the tones and colors of your photo, similar to adjustments you make in iPhoto, Aperture or Photoshop.

The basic suggestions I outline above should get you good photo prints, but I encourage you to share in the comments section below your questions and experiences with photo printing using your computer, and also your experiences with other printers besides Epson.


Comments
I’ve never had any luck printing photos. The colors always come out crap.
Conversely, I’ve never had any problems using a print shop, even cheapies like kmart.
So I always figure by the time I fiddle around and get the colours right at home, I’ve spent 5 times as much as it would have cost at a print shop.
If I could print at home and get it right first time, I would. But it never happens that way. I’ve even tried printing directly from the SD card with printer’s inbuilt software but still no luck.
So, if anyone knows a secret for getting good colour first time
Remember - it’s significantly cheaper to print photos at Walgreen than to print them on a printer.
I certainly love taking photos in my digital camera. It’s so nice to caught every life’s moments in a camera lens. But printing them? Well, it costs a lot. I can save them on my computer and have them printed if I think it should have a hardcopy. - Unilife Alan Shortall
You have a great article.I really enjoyed reading it I wonder though if this printer can also print foil business cards because I really need a printer which can do that.
good intro to photo printers, printer paper, and ink cartridges. Thanks for the tutorial. car title loan
I did some brochure printing online and I think that is cheaper than actually owning a printer and spending money on paper and ink. What do you think? Am I right?