Create Quick, Easy, and Fun Animations with PulpMotion
It’s not often I write up a review of some software on Apple Matters, leaving only the best dishes to be served. I’ve come across a few kits in the past that have enabled me to create something or other, but most were too complex to really get in to, so I ended up ditching them. However, Aquafades PulpMotion is the complete opposite of the spectrum here and the end product is absolutely incredible.
What is it? I hear you ask. PulpMotion, as described on the developer’s website, is a moving slideshow application for OS X, but the name really doesn’t do this any justice. In short, you can create animations using your own pictures, videos, and music, wrap it up into one nice package, and show it off to friends and family in the easiest of fashions—a slightly more creative way to show off your recent holiday to Dubai.
How it’s done
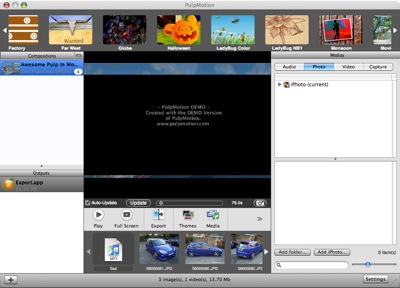
PulpMotion is broken down into several windows, with your animation themes at the top, current compositions to the left, your media/options to the right, and the timeline of your animation at the bottom, with the very middle screen being used as a preview window.

With that, the process is incredibly simple. Create a new composition, select a theme for the animation, using the media window select a music track as the backing music for your animation, followed by the pictures you want to use, and then drag and drop all of those bad boys into the timeline at the bottom in the order you wish for them to appear and then preview your animation. It’s that simple.
Themes

Before you start your animation it’s best to select a theme from one of the very many available. Some are rather simple, while others show a little more complexity or imagination, but there’s definitely something to suit every mood or occasion. Unfortunately there’s no clearer way to preview themes other than in the bar at the top (pictured) of PulpMotion, but selecting a theme and then hitting the “Play” button provides a real-time preview at a lower resolution than the final build, if you will, of your composition. My favourite theme is “San Francisco,” which has your media flying high in air balloons over a clever drawing of the Golden Gate Bridge—the most recent photo or movie is flown by the front of the screen with older media gliding by in the background.
Media
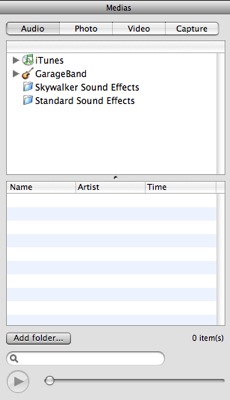
The Media pane is broken into four sections, as seen in the image below—Audio, Photo, Video, and Capture. I think it’s fair to say the first three are pretty self-explanatory, but each one allows you to select that particular type of media from within your iTunes and iPhoto libraries, as well as your Movies folder (in Video). If you’re after a particular set of photos or perhaps one song by Michael Jackson, simply use the search bar at the bottom of the pane to locate your desired item. It’s also worth noting that you can only hold one song per animation, so choose wisely using the preview button at the bottom.

The fourth section, Capture, is one I’ve not had the chance to play with but it seems pretty clever. Using an iSight or DV camera currently connected to your computer, sit back, smile, and take a snapshot or live video of your beautiful self and insert it straight into your animation!
Going back to the search function, I’m actually rather impressed by the way PulpMotion manages to grab every song from your iTunes library, every photo from your iPhoto library, and every Movie you hold dear to your heart in virtually a matter of seconds; it’s almost like it’s completely integrated with iLife.
Once you’ve made your selection it’s simply a case of dragging the file from the Media pane to the timeline at the bottom and shifting items around until you see fit. Once you’re happy with everything, hit the “Update” button followed swiftly by “Play” and watch a low-res preview of your animation kick into gear.
Settings
The great thing about PulpMotion is that you can create something that looks like a lot of work has been put in, without actually putting much work in at all, so it’s always nice when there are just the right amount of options available to customize your composition, without blowing your mind completely and forcing you to quit while you’re ahead.
The settings pane is broken into three parts. The first is the Title and Story (a short summary) of your animation that will appear at the start. The second part is dependent on which theme you’ve selected, but it generally boils down to you being able to select the speed at which the animation runs, as well as a few other customization options, such as text colour or theme layout. The last part of the settings pane is the Quality of your animation, with High and Best being a must for anyone wishing to show off photos or movies at the greatest of resolutions. It’s also worth mentioning that there is a “Quick Preview” option available so you don’t have to render your movie for too long each time you want to preview it. A note to the newbies out there: higher quality will mean slower rendering speeds, so be patient!
So what do you do when you’ve finished your animation?
After you’ve played about with the different themes, added the content you wish to add, and sorted out all the options in between, it’s time to compile your animation, and there are a variety of ways to do it.
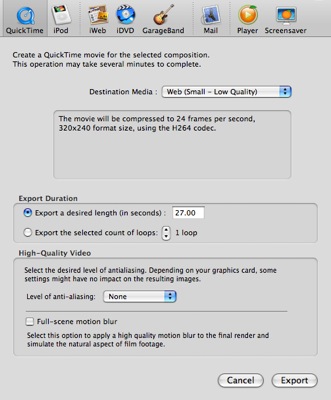
By heading to File > Export you are shown a screen with quite a few export options.

You are able to export your animation to a QuickTime movie, straight to your iPod, to iWeb to be integrated right into your website, iDVD so that you can burn your animation to disc to send to relatives, Garageband, Mail to email to friends and families, and, lastly, as a Player and a Screensaver. Let me explain the last two in a little more detail.
Player is PulpMotion’s way of gathering your entire animation and sticking it into a double-clickable document with its player, also giving you the option of wrapping it up inside a Disk Image. Once the recipient opens the player they are presented with a postcard-style image that contains a little greeting set by yourself and, of course, your animation. Email that to your gran and she’ll be thrilled, I’m sure.
The Screensaver export is, as you expect, a screensaver. After all that hard work and sending it to others, wouldn’t it be nice to see your animation appear every time your computer goes idle? I managed to combine a set of photos of my newborn niece in an animation recently and set it as my screensaver and it looks absolutely incredible.
Summary
The only major drawback I’ve noticed with PulpMotion is removing music from the timeline. It’s easy enough to replace your music selection, but actually removing it via drag-and-drop seems to take a lot longer than with photos or videos. Other than that, though, there aren’t really any other faults worth mentioning.
Hopefully after reading this review you’ll understand just how simple PulpMotion is to use and how brilliant the end product can be, but surely seeing is better than believing? I leave it to this YouTube video to show you how it’s all done and perhaps you’ll be enticed into spending $29.95 on PulpMotion within the very near future.
You can try a demo from Aquafades PulpMotion website before buying for $29.95 (€25), as mentioned, using Paypal. It’s not quite clear if there are any limitations in the demo, but there will be a moving watermark present on anything you export at the end.
Website: http://www.pulpmotion.com/index.html
Demo: http://www.pulpmotion.com/try-video-photo-slideshow.html
Latest Release: 1.0.5 released 1st March 2007
File Size: 62MB
Requirements: Mac OS X 10.4 Tiger with Quicktime 7 or higher
Rating: 8/10


Comments
I’d like to introduce graphic web tool wich u can make amazing photo effects with your family pictures ! http://www.pato.pl/en/
I’d like to introduce graphic web tool wich u can make amazing photo effects with your family pictures !